[an error occurred while processing this directive]
[an error occurred while processing this directive]
[an error occurred while processing this directive]
[an error occurred while processing this directive]
3dr 3D Rotate User Manual
3. Interface
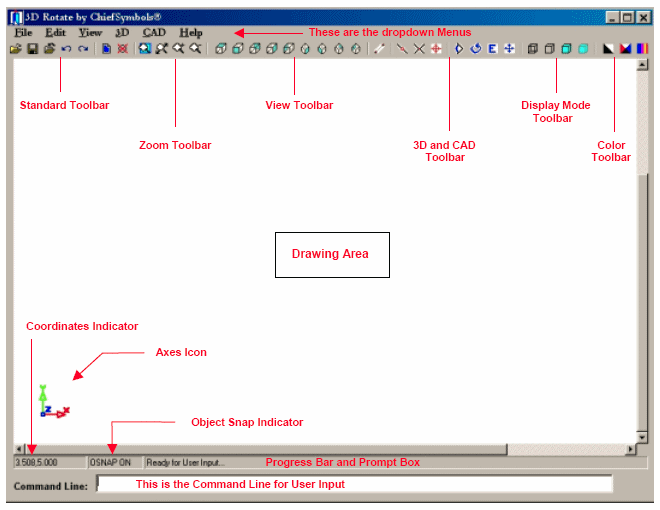
Here is a
screen shot of the ChiefSymbols® 3D Rotate
drawing window:
The elements of the main window are:
1. Drawing Area.
This is where the objects are displayed. The background color of the Drawing Area can be set by the user
with the Set Screen Color tool, and the Toggle Screen Color tool can be used
toggle the background between black and white.
2. Dropdown Menus.
The dropdown menus group the commands by category. Clicking on a menu item will invoke the
stated command.
3. Toolbars.
The toolbars also group the commands by category. Allowing the cursor to hover over a toolbar
button for a second will pop up a caption explaining the operation associated
with that button. Pressing on a toolbar
button invokes the related command.
4. Progress Bar and Prompt Box. Messages and status reports to the user
will appear in this area. It is here
that you will see messages asking you for input when it is needed. This is also where a progress bar will
display during time-intensive operations, such as the loading of a large file.
5. Command Line.
This is where the cursor is always stationed, ready for the user to
enter text. . After inputting information into the Command Line, remember to
press the Enter key to continue.
6. Coordinates Indicator. This box will show you the x and y coordinates of the
cursor. These numbers will be accurate
in Top, Front, or Side views but are not accurate in isometric views.
7. Axes Icon. This icon
shows you the orientation of the X, Y, and Z axes relative to your
viewpoint. In the above image the axes
icon indicates that the viewer is looking at the drawing area from a Top view,
with the Z axis perpendicular to the user’s view.
8. Object Snap Indicator. This box shows you whether Object Snap is activated (“On”) or
not (“Off”). Turning Object Snap on
allows you to snap the cursor to snap points on objects. See a complete description of this tool in
the Edit Tools section of this User Manual.